
-
Squareup NOT Ready for Canada
 Several weeks ago I began my search for a mobile credit card reader that would allow me to take Visa and Mastercard from my customers. Rather than going with an expensive Point of Sale (POS) machine from one of the banks, I’ve been exploring the various mobile phone readers. These readers are little devices that attach to your Android or iPhone that allow a card to be swiped and a transaction completed. For the convenience of this service, you pay a certain percentage to the company supplying the device. There are a number of companies offering these mobile readers including Payfirma, Paypal, Intuit, Payd and Squarup.
Squareup recently opened up in Canada, so I thought I would give them a try. They have good rates and their reader is free. Unfortunately, that is about as good as it gets with this company. I went through their signup process and online ‘verification of identity’ and received back a rather cryptic message saying that I could not be verified at this time, but someone from their customer service department would contact me shortly. I waited a week – no contact. So I emailed them back and asked what was going on. ‘Violet’ replied, “Thanks for writing in. It looks like you have not yet completed activating your Square account. To complete activation, please log in to your Square Dashboard at https://squareup.com/activate.” Ok, well I went through the complete process on your site … not sure how I did not ‘complete’ my activation but whatever. Back to their site and through the signup process again.
This time I get a message saying that my identity could not be verified. Keep in mind that during the signup process I had supplied them with my Social Insurance number as well as other pieces of information about where I live and where I do my banking. This time the customer service person (‘Sally’) said she would ‘reset’ my application and gave me some suggestions why my application had be denied. One of the reasons given was if I had moved recently, that I should enter my old address. So – back to the signup form (third time.) I went through all the questions, etc but this time used my Ontario address instead of where I really live here in Manitoba. (I moved about 2 months ago.)
This time I got this message: “We’re unable to approve you at this time. We’re working hard to approve as many people as possible as we launch in Canada. We’ll get back to you when we can activate you to accept payment cards.”
So I emailed them again. This is the reply from ‘Sally’:
Thanks for writing back in. It looks like your application was again declined because we were unable to verify your identity during the activation process.
Our decision remains that we can not approve your request to accept card payments with Square. There is nothing more we can do for you at this time.
We are working hard to activate more people. Should we have an update, we’ll let you know.Thanks for your understanding.
Sincerely,
“Thanks for my understanding”??? I DON’T understand. I am who I say I am. I run a very public business. My phone numbers, names, personal identity and history is all over the internet. It is very easy to ‘verify’ who I am. They have simply made a decision based on some automated verification process that for whatever reason my application information fails. That’s it. Period.
This is the line that irritates me the most, “There is nothing more we can do for you at this time.” What they really mean is ‘there is nothing more we are going to do for you …’. It’s not that there is nothing they ‘can’ do, just that they are not willing to do any further steps to verify who I am … even though it is their process that has denied me. What would it take? A phone call? An email to my bank? A copy of some communication from Revenue Canada with my name and address on it? How hard is that?? If your verification process is so strict, what about having a department of ‘live’ people (preferably in Canada … )
Conclusion: Squareup is NOT ready for the big time yet. They appear to be a narrow-minded, unresponsive company who is looking to get as many signups as they can without actually doing any work. My advice is to skip Squareup and work with any of the other companies that I mentioned at the beginning of this post. Will try Paypal now.
Update Feb 14/13:
I have never heard anything back from Squareup. I’ve emailed them a couple of more times asking for them to provide some other way of verifying me, but they don’t even reply to the emails now. This is a perfect example of how to NOT do customer service!
Paypal is in exclusive testing here in Canada right now, and are not accepting new testers – so I will wait and try them later.
So I decided to give PAYd a try. They offer the exact same type of product at virtually the same rates as Squareup and Paypal. The signup was easy – just my basic information and a few verification questions – and 24 hours later I get this in my inbox:
Dear Todd,
We’re pleased to let you know that your PAYD™ account has been approved! Follow the instructions on this email to begin accepting credit cards today. Here is your PAYD merchant and store ID. Keep this information handy for future reference.
So – PAYD! was able to verify me with EXACTLY the same information as what I gave Squareup, and within 24 hours I was setup and ready to take credit cards.
Based on my experiences with both companies – well, it’s not even a contest. Don’t even waste your time with Squareup – go with PAYD!

-
Dishwasher Fire: Close Call
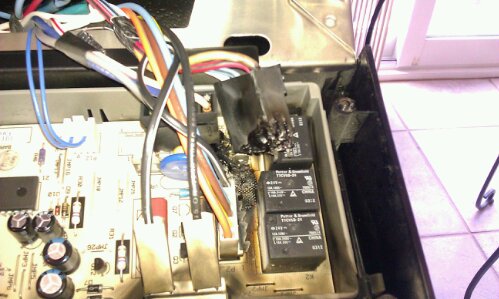
This one was a close call! This control board was smouldering along nicely until the thermal fuse opened and cut the power to the control panel. That’s exactly what that safety fuse is there for – it did its job. I can’t for the life of me understand why there are tech’s out there who simply bypass them. Crazy.


-
Shipping Bolts
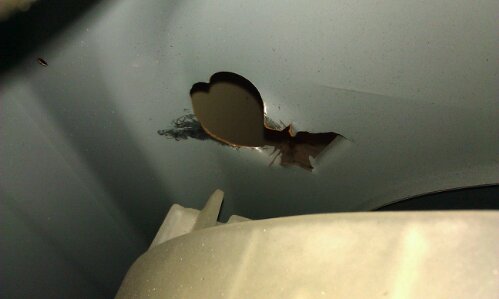

This is what the back of a washer looks like when you run it for a couple of years with the shipping bolts in place.
-
Whirlpool Front Loader Noises
Just a quick Tech Tip.
This video is showing the newer Whirlpool or Maytag front loading washing machine. When you give the tub a spin, as techs, we are used to not hearing really much of anything. However, when you give the tub a spin on this unit, you hear liquid and what sounds like marble banging around. This is normal. The sounds you are hearing is the balance ring which contains heavy oil and ball bearings to try to counterbalance an off-balance load.
httpvh://www.youtube.com/watch?v=lJsLqbyP7Ss
-
Freon Leak

Yep – that’s a Freon leak! Replaced the rotten line and the customer is back in business with a cold fridge.
-
Bottom Mount Whirlpool Fridge Leaking Water
EDIT: New Whirlpool Refrigerators. The issue described below was resolved on the assembly line at Whirlpool at least 2 years ago. New Whirlpool refrigerators have different drain systems. This does not mean that they will never have a drain problem = since the invention of the self-defrosting fridges we’ve been fixing plugged drains, but it does mean that the problem outlined is no longer an ongoing issue on new fridges.
If your Maytag or Whirlpool bottom mount fridge is leaking water, it might have a blocked drain in the freezer section. The symptoms typically are periodic water on the floor in front of the fridge and a sheet of ice in the bottom of the freezer. The way the defrost system works is: every 6 to 8 hours we turn on a heating element in the freezer section to melt any frost build up on the evaporator. This water drips down into a trough and then drains via a tube to the drain pan in the bottom of the fridge where it evaporates away. When that tube gets blocked, the water backs up into the trough in the freezer eventually spilling down into the bottom of the freezer where it freezes.
There is only one way to repair this problem properly so that the problem does not come back … just defrosting the unit is not a perminment repair (just a hint to those companies that I’ve been following around these days.)
What usually happens is something gets caught in the grommet which is attached to the bottom of the drain tube. (The grommet is the soft black rubber ‘duck bill’ valve that is slipped on to the bottom of he drain tube that prevents warm air from migrating into the freezer – more on this later.) The blockage could be a gummed up spill (like milk), a pea, bits of bread crumbs or anything else that could be carried into the drain. What I’m finding a lot of is bits of insulation from the manufacturing process ending up in that grommet. This blockage holds water that begins to freeze and eventually creates a dam and complelely blocks off the drain … and then you end up with water on the floor.
Here is a picture of a big chuck of insulation that was caught in the ice that was built up in the drain trough.

Chunk of insulation in drain trough. Here are more bits of insulation in the drain trough. These bits flow into the drain tube and are caught by the grommet eventually blocking it up.

More bits of insulation in the drain trough. This is what the grommet looks like with bits of junk and gummed up gunk in it.

Grommet with bits of insulation trapped in it. How to Repair
The only way to properly repair this is to clear all the ice out of the trough and drain tube. Then remove the grommet from the bottom of the drain tube (accessed from the compressor compartment), clean it out and trim it open a bit. This is the part of the repair where things might get a bit dicey. Whirlpool will NOT want this done! What the grommet does is prevent the freezer from equalizing the air pressure through the drain tube when the freezer door is shut. If the grommet is not there, then when the air pressure equalizes, it will draw warm moist air through the drain tube which coats the evaporator and can cause potential moisture issues in other areas. The trouble is: the grommet opening is just a slit and is easily restricted. This is causing multiple calls for the same issue (blocked drain causing leaks.)
So what to do?
Here is what I do. I trim the end off the grommet. This allows the water to flow out more easily and helps prevent blockages while at the same time still restricts air from free flowing into the freezer through the drain tube. I’ve gone back to a number of fridges where I’ve done this repair and rechecked the evaporator and have not found any excessive frost or moisture, so I’m confident that I’m not causing other problems by doing this. However … this is not the official repair, so do at your own risk.
Here is what the grommet looks like trimmed.

Trimmed grommet. If you are fixing these some other way, I would love to hear about it … always looking for new ways to do repairs!
Update!
EDIT: Since I made this post, Whirlpool has come out with a ‘official’ repair for this problem. It involves a new ‘p-trap’ which replaces the ‘duck-bill’ grommet that was getting full of junk and sticking together. Even with this p-trap repair being available, if you want to do the repair yourself and don’t want to pay a Whirlpool certified repairman, the above repair works just as well. I’ve never had a callback on this repair, and I’ve done it dozens of times, so you can have confidence with it. That being said, here is the info on the repair kit from Whirlpool:

My understanding is that the part will be provided at no cost for up to 2 years from the date of purchase. Visit Whirlpool.com for more information.
Edit … Part Deux!!
Here is a video of how to install the new drain tube. It’s pretty easy – should only be about a 15 minute job. Don’t forget to clear the ice out of drain at the back bottom of the freezer section … otherwise the water will continue to leak even after you’ve completed the repair (either the ‘snip’ or the drain tube install.)
httpvh://www.youtube.com/watch?v=7akWydOJyhc
Edit … Part 3 The Final Chapter! (Maybe. lol.)
Here is a quick cautionary video showing how easy it is break the drain pan. Don’t crack it = you will NOT like that repair if you have to replace it. (Glue does not work!) You want to work out the old trough by pushing on the tab, not just bending it or ripping it out.
httpvh://www.youtube.com/watch?v=iCdaghxERAY
-
Dishwasher Siphoning Out
httpvh://www.youtube.com/watch?v=hpfcIuLLIYQ
This is a cool problem that can sometimes be hard to catch. What is happening here, is when the dishwasher goes into drain, it starts a siphon. The siphon then pulls all the water out of the machine and if it is strong enough it will also pull out the next fill. This situation occurs primarily when the drain is installed straight down into the basement instead of into a drain stub under the sink in the kitchen. When it is installed under the sink, the level of the drain is higher than the water level in the dishwasher and a siphon cannot start. However, with the drain below the level of the water, siphoning can occur. I find that even with a high loop installed on the side of the dishwasher, if the drain goes straight down from the loop a siphon will still be created. The only way to really stop this is to install an ‘air-gap’ or a ‘siphon break’ into the drain line which will allow air into the loop and prevent any siphon from occurring.
With this unit, the water siphoned out and then the heater came on to heat the water (that was no longer in the unit.) This created a higher amp draw than normal because no water was flowing over the element, which in turn took out the safety fuse in the control panel area.
This customer will have his installer back into reroute his drain.
-
What Bad Pots Will Do To Your Glasstop Stove
My advice: if you are going to spend $1200 on a new glasstop stove, you should also spend a $100 or so more and buy yourself some new cookware that has flat bottoms. This series of photos show what a warped frying pan looks like and what it will do to your glasstop in 6 months as well. This was an Indian customer who was also using that wire grate as a grill to grill the underside of their Chapati (Indian flatbread.) This is not a good idea as the stove was designed to have the heat from the elements absorbed by something and not to essentially be heating air. $450 for the new glasstop. Thank you very much.
httpvh://www.youtube.com/watch?v=5UpurstH4GE


-
Melted Stove Coil Elements
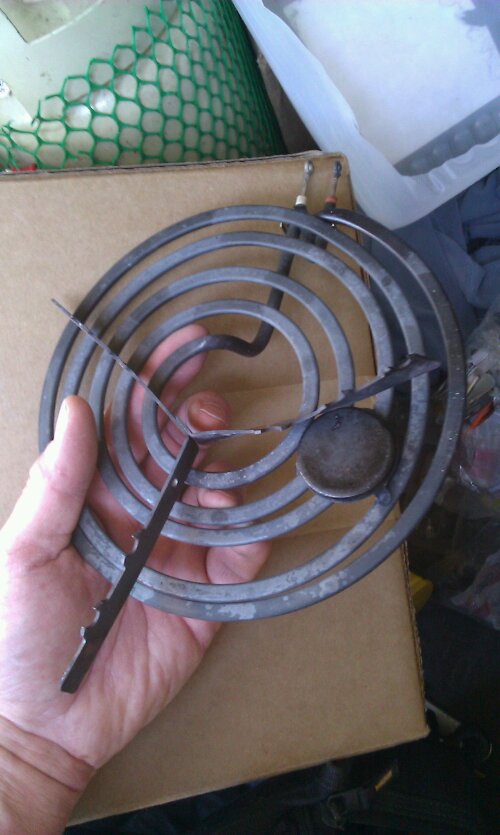
This element is 6 months old. Funny – some people go years without problems, others melt elements in 6 months. While, elements today are certainly not as sturdy as elements from 20 years ago, I’m convinced that this is caused by cooking style. Running an element red hot on high 10 to 12 hours a day will cause this every time.
-
Computer Problem With A Duet Washer
This is a cool problem that I’ve not seen on this unit before. The washer will start and make all the right sounds – then suddenly unlock and sit there flashing for ever. Almost like someone has touched the ‘pause’ button – except nobody has. I’m going with a CCU on this one, but it could end up being a UI (User Interface.). I’ll let you know.
httpvh://www.youtube.com/watch?v=HMlxI2T7mOQ
EDIT: So this one ended up being a User Interface. It looks like Start button was shoring out and causing the unit to go into ‘Pause’ which is why the door was unlocking and the lights are flashing … just like someone had hit the ‘Pause’ button. Unfortuately I went with the CCU first thinking that something in the CCU was causing the stoppage – but this did not fix the problem. If you see this – go with the UI first! Live and learn.


